Archive
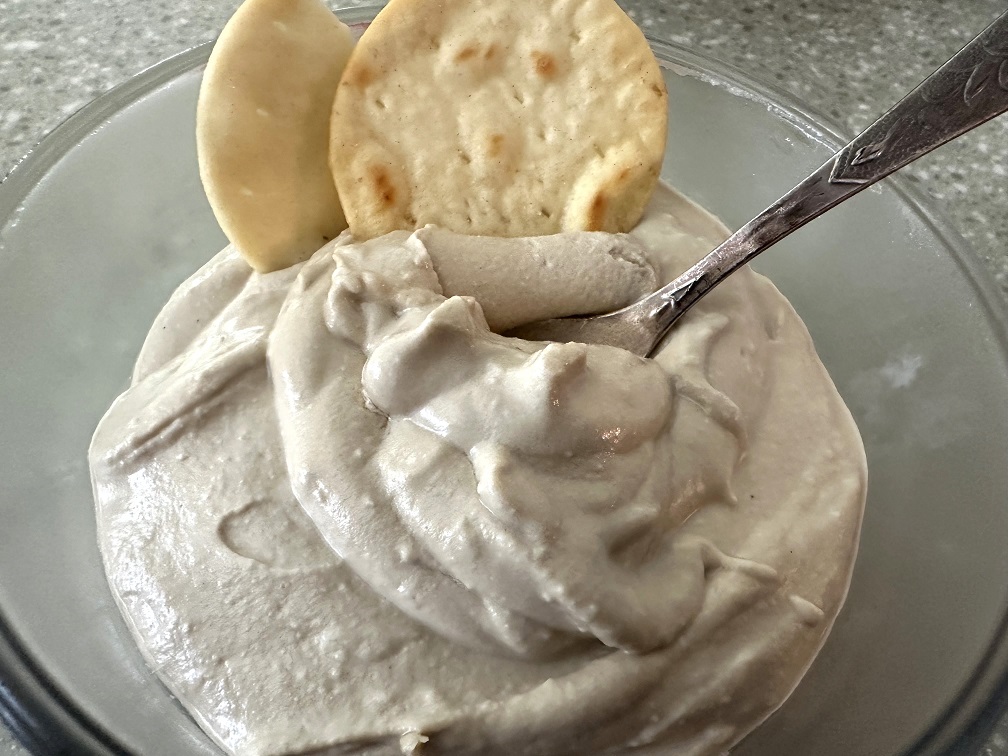
Simple Recipes: Cottage Cheese
I can hear you saying “what?” Every supermarket sells at least 10 different kinds. Why should I bother making it?
I’m not here to argue. I’m here simply to share. This is what this whole blog is all about. Sharing the experiences for what it’s worth. Also, this blog serves as my personal memory journal. Once it is published here, I can always come back to it later. Anyway, let’s get back to the subject of this post.
I have two reasons for making my own cottage cheese. First, taste. Second, cost.
Food store offerings around the country might differ vastly, and I don’t know if we share the same experience. But here in my town, the cottage cheese selection in a typical supermarket is limited to 4-5 types, with the prices ranging from $3 to $7+ per pound. But strictly focusing on the taste, I find most of the cottage cheeses I tried edible, but none of them are really tasty.
I tried to find a good recipe to make cottage cheese many times. Made many attempts and wasted a lot of milk in the process. Until finally, my wife found a recipe on Instagram that seemed promising. We tried it, and it was a home run! We got tasty cottage cheese, and got a very good amount of it. As I told you, I was looking for a better taste and better cost, and this recipe answered both. And it is really, really simple.
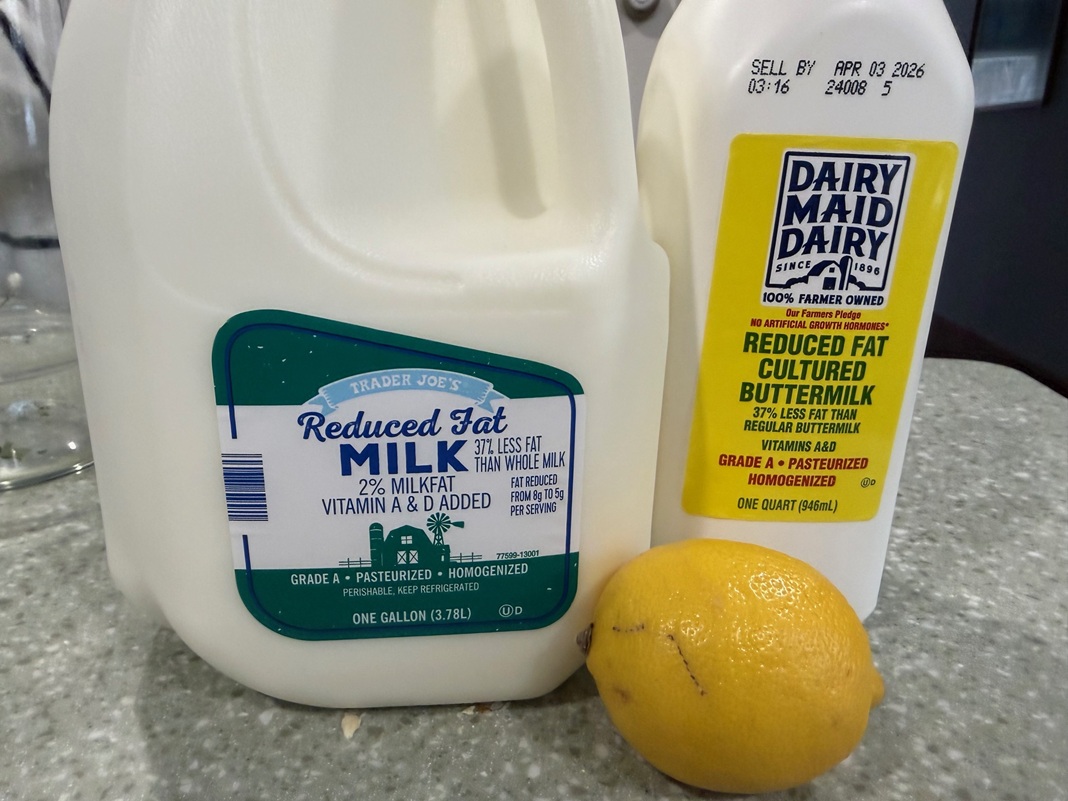
There are only 3 ingredients in this recipe – milk, kefir/buttermilk, and lemon. That’s it! You can make it all organic if you want by using only organic ingredients. You can also easily control the fat content. I’m not sure how well it will work if you use skim milk, but we have done this with both 2% milk and 4% (whole) milk, and we liked the result in both cases.
The first step is very simple – in the large pot, combine a gallon of milk, a quart of buttermilk, and the juice of one small lemon (2 tablespoons or less, unless you like sour things). Mix it, cover the pot, and put it into a warm place for 24 hours.
Here is where it gets a bit tricky. For this recipe to work, you need to maintain an average temperature of 85°F (I’m sure 80°F to 90°F will work equally well). We are lucky, as we have a room with a radiant heat floor where we can close the door and maintain this temperature. In the original video, the pot was placed outside in Florida, which I’m sure would give you the right temperature. Once summer comes, this will be our plan too. If necessary, you can heat up the pot to 85°F, and then cover it with blankets. Anyway, I’m assuming you can figure it out.
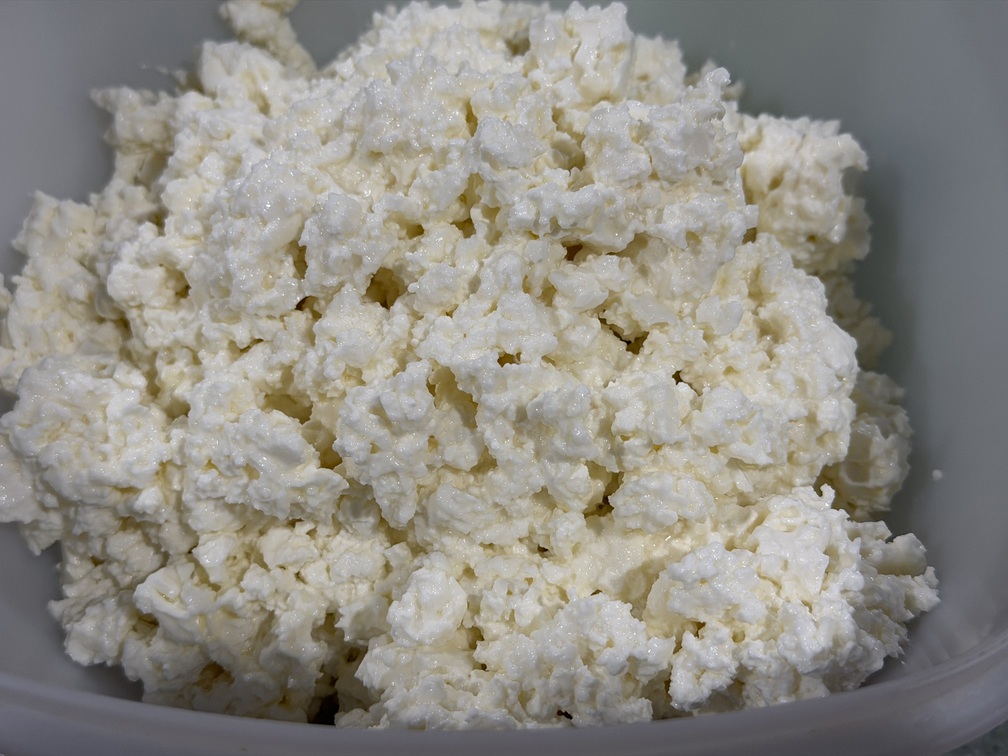
After 24 hours, when you open the pot, you should be able to see a “crust” floating on top. Put the pot on the stove and start gently heating it up, pretty much on the lowest setting. You need to bring the liquid to the boil, but not allow it to boil. This heating-up process should take about 45 minutes. Don’t rush it. It was tested multiple times – 45 minutes is what you need, give or take a few minutes.
Now, the most important step. Take the pot off the heat and let it cool off. It should cool off sufficiently for you to be able to put it into the refrigerator overnight. The next day, the cottage cheese will be collected at the bottom. Now, you can dump the whey, or you can use it – there are many options. We typically just drain the pot through the fine mesh and then just leave the mesh for another 30 minutes to let the water drain. As our goal is cottage cheese, which is granular, and not farmer cheese, which is usually compact and smooth, we don’t specifically squeeze the moisture out; we just let the cottage cheese drain. If you want to get to the farmer cheese consistency, you can, of course, use the cheesecloth and squeeze all the moisture out.
Voila! The cottage cheese is ready to be enjoyed in whatever way you like. By the way, we typically don’t add salt, but of course, you can.
As I mentioned cost as one of the factors in this exercise, let me give you the details. The gallon of 2% milk we typically use costs $3.99 at Trader Joe’s. The quart of buttermilk shown in the picture above is $2.99. We can count the lemon at $.50, so the total cost is $7.50. Our typical yield from 5 liters of liquid is 3 lb of cottage cheese, which brings our cost to roughly $2.50 per pound. This is definitely reasonable.
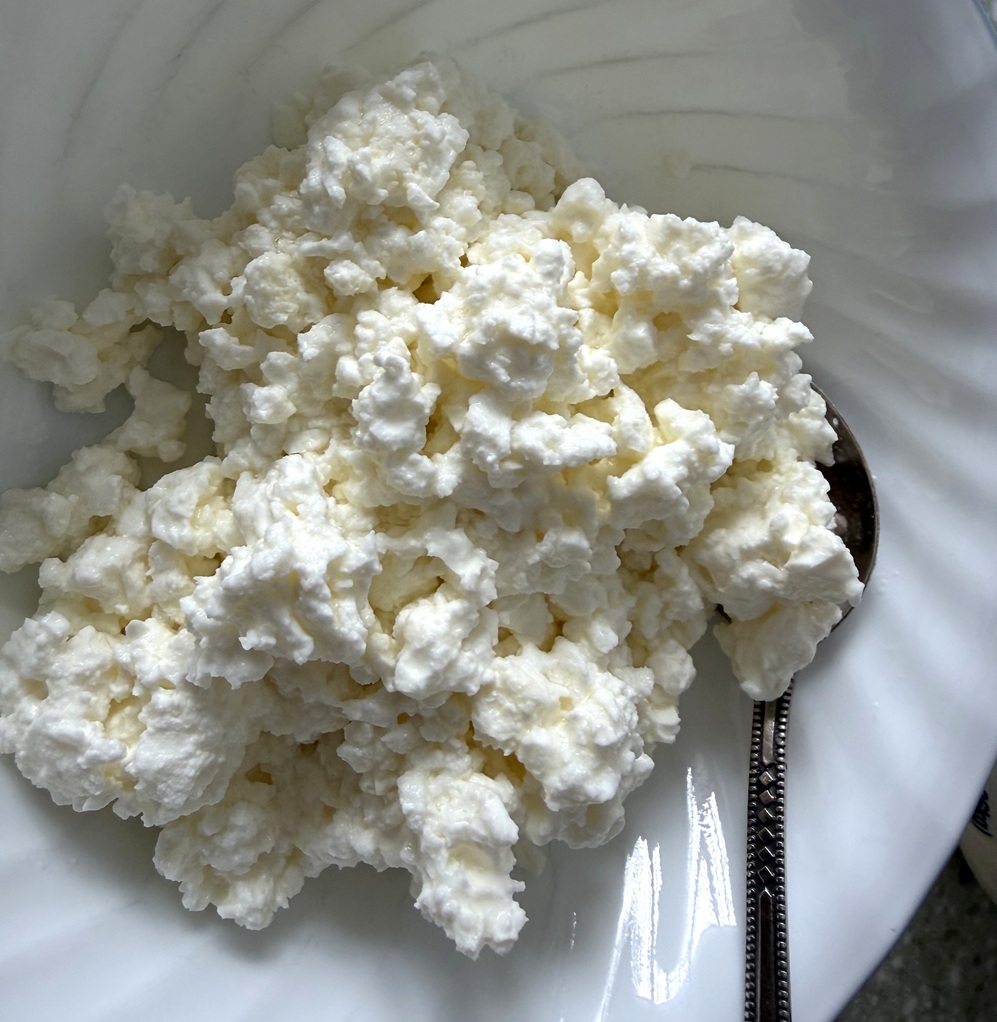
And yet the main goal here is tasty cottage cheese, and this is exactly what this recipe allows you to achieve. We are now making it every week, and it is our typical breakfast staple here.
There you are, my friends. A simple recipe worth making. If you try it, and I really encourage you to try it, I will be really curious to hear your feedback.
And until the next time – bon appetit!
Simple Recipes: Chicken Liver Pate
It’s been a while since I published any recipes on this blog. It doesn’t mean, however, that I don’t have any recipes to share. So let’s correct it.
As the title says, I like simple recipes. The meaning of “simple” is relative. For example, I’m sure that the absolute majority of people consider an omelette simple – both in recipe and in the making. And yet making an omelette can be a test for the chef, which is easy to fail. And take a look at the Japanese omelettes, those that are oozing when sliced on top of other food. Good luck making those in your home kitchen. Simple? Maybe not so much.
In my book, simple means primarily the way of cooking. For example, chicken legs or braised beef in the slow cooker are simple – put together all ingredients at once, turn it on, close the lid, walk away, come back in 6 to 8 hours for a delicious meal. That is what I call simple. Making delicious onion soup, on the other hand, is very far from simple. Despite a very few ingredients, the process is very involved – look away, and you will have to start all over. I’m sure you got my point.
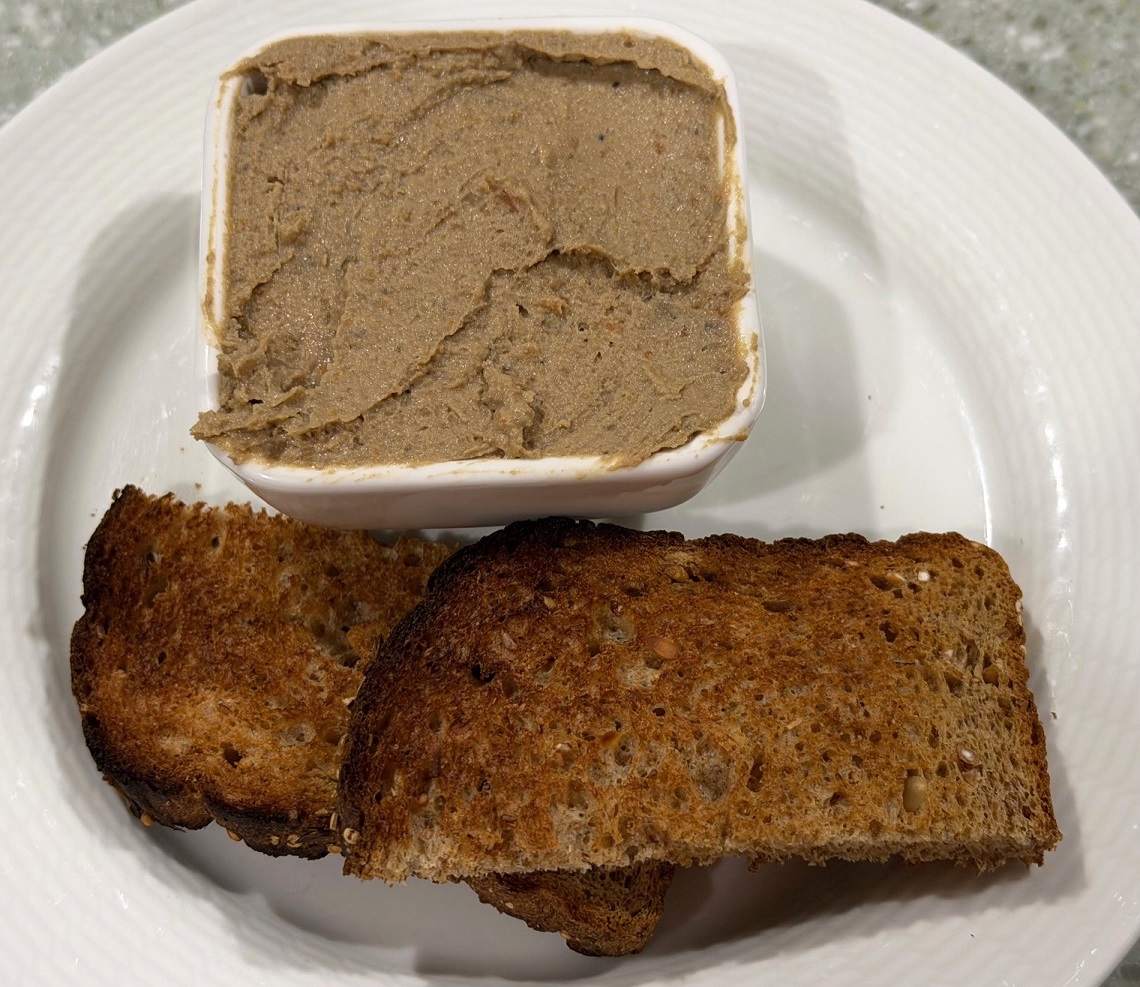
Okay, now to the chicken liver pate. I love chicken liver pate. When it is well-made and tasty, just spread it on the toast, maybe add some onion preserve or a cornichon, take a bite, and your taste buds start singing. To me, it is one of the simple pleasures.
I started making chicken liver pate a while back, as it is very difficult to find a tasty version in the store. For the longest time, my go-to recipe was the one from Emeril Lagasse from the Food Network, which I followed very closely. Making chicken liver pate using this recipe is an involved step-by-step process, requiring about an hour or a bit more of active labor.
And then there is Instagram. It really became a source of cooking inspiration for me, with lots and lots of interesting recipes (not all recipes are created equal; you have to be ready to fail). A few days ago, I saw someone making a chicken liver pate in a very simple way, combining all ingredients in the tray and baking all at once in the oven, then processing it through the blender, and voila – enjoying the chicken liver pate. So I decided to try more or less the same, just incorporating a couple of elements from Emeril’s recipe into the process.
Two elements that I decided to add were cognac and green peppercorns. While making the chicken liver pate throughout the years, I tried different options, and found both irreplaceable, at least for my taste. So here is my new favorite recipe for the chicken liver pate.
Ingredients:
- 1 pound of fresh chicken livers
- 1 stick of butter
- 1 large red onion, sliced into 8 pieces
- 2 carrots, peeled and roughly sliced into big chunks
- 1 Granny Smith apple, cored and sliced into quarters (don’t peel it)
- 3-4 garlic cloves
- 1/4 of a cup Cognac or Brandy
- 1 teaspoon green peppercorns
- 3-4 bay leaves
- 3-4 allspice
- Salt and pepper to taste
Directions:
1. Preheat oven to 350 F
2. In a small roasting pan (I used a 9×9 glass pan), combine chicken livers, slices of carrots, onion chunks, apple chunks, garlic, 1/3 of the stick of butter sliced into chunks and placed evenly, bay leaves, and allspice. Add salt and pepper.
3. Put into the oven and bake uncovered for 45 minutes.
4. Take the pan out of the oven, add green peppercorns, and pour in the cognac. Mix the contents of the pan, and put it back into the oven for 10-15 minutes.
5. Take the pan out of the oven. Let it cool for 5 minutes or so. Remove bay leaves and allspice.
6. Transfer the content of the pan into a blender and add the rest of the butter (2/3 of a stick) to the blender in small chunks.
7. Blend until smooth, 2-3 minutes, scraping the walls of the can as needed.
8. Transfer into a glass container, let it cool off, and place it in the refrigerator for 3-4 hours (preferably overnight).
That’s all! Next, enjoy it with the toast or whatever way you like.
Notes:
1. Emeril’s recipe calls for soaking chicken livers in the milk for 2 hours in the fridge to remove bitterness. I have done it both ways, soaking and not, and I don’t see a difference. I didn’t soak it this time, and it was just delicious.
2. You can adjust the amount of green peppercorns to your liking. More peppercorns means spicier pate. But it is a mild spice.
3. Don’t substitute green peppercorns with black. The taste will be too aggressive. Green peppercorns are also softer, so if you use black peppercorns, the texture will be affected. If you can’t find green peppercorns in the store, you can buy them on Amazon.
4. Don’t substitute cognac with other types of alcohol (yes, you can use Armagnac or other brandy). Cognac brings both sweetness and a flavor profile that goes well with the other ingredients. I tried once using a bourbon, and the taste was ruined.
That’s all I have for you for now. But more of the simple recipes are coming.
Bon appetit!
New Recipe: Best Hummus Ever
Okay, here we go – a very modest title. “Best ever”, nonetheless.
Well, I love hummus, and outside of Israel, for the most part, I much prefer homemade hummus over any store-bought versions. There was one exception to this – for about 9 months, Costco carried ready-made hummus, which was spectacular – and then it disappeared. But for the most part, the store-bought versions just don’t cut it, so the only way for me to enjoy hummus is by making it myself.
I already shared a hummus recipe on this blog – but since publishing it, I learned a few things, and while this updated recipe uses basically all the same ingredients, the proportions are different, as well as the methodology. Let me list the recipe ingredients first, and then we can talk about it.
Ingredients and tools:
- Dry chickpeas – 1 lb
- Olive oil – 6 tablespoons (approx)
- Kosher salt – 2 teaspoons
- Baking soda – 2 tablespoons
- Tahini – 1 lb (one jar)
- Roasted garlic + roasted garlic oil (see below)
- Fresh Garlic – 3 cloves
- Lemon – 2
- Ice-cold water, 1/3 of a cup
- Blender
In comparison with the previous recipe, this one uses only 2 teaspoons of salt instead of 2 tablespoons, and it requires much less olive oil than the previous one. At the same time, the amount of tahini has doubled. But still this is not a major change. Let’s go step by step through the prep process.
Before we talk about the main hummus ingredient, chickpeas, let’s talk about roasted garlic. In the previous recipe, the garlic was minced and then slowly roasted in the frying pan with olive oil. I now have a much simpler method to make delicious roasted garlic.
Roasted garlic simple recipe:
Preheat oven to 250°F. Peel cloves from 2 heads of garlic. Put garlic cloves in a single layer at the bottom of a small cast-iron or heavy metal oven-safe pan. Pour enough of good olive oil to cover all garlic cloves completely. Cover and put into the oven for 1 hour. In one hour, you will end up with golden roasted garlic cloves and deliciously infused olive oil. Let it cool off, pour into the air-tight container (any used glass jar from preserves or similar will do), and store in the refrigerator. You now have roasted garlic to use as your heart’s desire – for example, to make roasted garlic hummus :). Just take the jar out of the refrigerator a few hours before you are planning to use it (olive oil has a tendency to solidify in the refrigerator).
")
")
Now, let’s get back to our hummus.
First, we need to soak garbanzo beans (a.k.a. chickpeas) in cold water overnight, allowing dried beans to expand. Never use canned garbanzo beans as making a tasty hummus from them is mission impossible. By the way, I now have my favorite dried chickpeas to use in this recipe – non-GMO, family-farmed chickpeas from the state of Washington – you can find them on Amazon. In the morning, drain the chickpeas and let them dry a bit.
Put a large pan (the same pan you will use for boiling the chickpeas) on medium heat, put in the chickpeas, sprinkle two tablespoons of baking soda on top, and fry the beans (don’t add water or salt!) for 3-4 minutes. You will need to constantly stir the chickpeas so they will not start sticking to the bottom of the pan. After you see that the chickpeas are starting to get a bit of color, add cold water, bring to a boil, reduce the heat, and let it boil for about 40 minutes. Again, do not add salt! Salt will make the chickpeas cook for about 2 hours, and will make them a lot more dense. While chickpeas are cooking, remove the foam from the surface, and also use a slotted spoon to remove loose floating chickpeas’ “skins” – this will make hummus creamier. At around the 35-minute mark, start checking the chickpeas. Once they are fully tender, you can remove the pan from the heat and drain the chickpeas. Reserve a cup of liquid, just in case the hummus comes out too dense.
Once the chickpeas have cooled off slightly, we can proceed with the next step. Note: I like to make hummus in two batches, it lets me adjust the garlic/salt/lemon profile exactly as I want it to be – for example, if the first batch too garlicky, I can use less garlic in the second batch; if the first batch is undersalted, I can add more salt to the second batch – both batches end up in the same container anyway and get mixed.
For one batch, put into the blender juice of one lemon, 3 tablespoons of olive oil, 1-2 cloves of fresh garlic, any amount of roasted garlic and roasted garlic oil you desire, and blend them together for one minute – this way I’m making sure the garlic cloves are well incorporated into the liquid. Next, add half of the chickpeas, half a jar of tahini (make sure to mix the tahini in the jar well before using), and one teaspoon of kosher salt. Blend for 2 minutes. After two minutes, while the blender is still running, add a small amount of the ice water and continue blending for another 30 seconds. Stop the blender, pour hummus into the container, and taste for garlic, salt, and lemon. Repeat the process with the second batch, adjusting garlic, salt, and lemon as needed for your taste.
Voilà – now your delicious hummus is ready. It will keep in the refrigerator for about two weeks.
That’s all there is to it. Let me know your thoughts in the comments, especially if you decide to make it!
Expect the Unexpected?
Wine is meant to go with food.
Food is meant to go with wine.
Together, food and wine are supposed to give you a much better experience than two individually.
You already know all of this.
And yet this is theory. When met at the table, sometimes food and wine actually work together and deliver a heavenly, memorable experience. Sometimes, food and wine just coexist without interfering. And sometimes they clash, ruining the experience completely.
The food and wine pairings typically work in one of two cases:
- Food and wine are professionally paired. The chef and sommelier work together, adjusting the flavors of the dish to work with the wine which was selected as a pairing.
- Food and wine come from the same place and had been playing together nicely for centuries. Think about Beef Bourgogne paired with Bourgogne wine – I think we can trust this combination, don’t we? Or would you ever question Chianti with the pasta with nice red sauce?

Now, for most of the time, we are not traveling and we are not eating at the high-end restaurant, yet we still should be able to enjoy the elevated food and wine experience at home – the rules are simple, right?
Maybe the rules are simple indeed, but we need to tread carefully. Beef Bourgogne is made with Bourgogne wine, and all Bourgogne reds are made from Pinot Noir. So what would happen if we will make the dish with actual Bourgogne, and then try pairing it with a nice big Pinot from California? There is a good chance that you will not enjoy that combination, not at all.
Chianti is made out of the Sangiovese grape (predominantly) – but don’t try to pair your pasta with the Sangiovese from California – again, there lies a great opportunity for disappointment.
I’m not saying that Beef Bourgogne will never work with the California Pinot – find a more restrained version, such as Sanford Pinot Noir, for example, and you might be fine – or better yet, simply cook the dish using the same wine you want to drink. Similarly, there are some California Sangiovese that might perfectly complement and elevate your favorite spaghetti dish, such as Castello di Amorosa Sangiovese – but you should expect some trial and error on the road to perfection.
I love Georgian wines. I would gladly drink Georgian Saperavi on any day. I love Georgian cuisine – properly made, the flavors are incredible and so is the pleasure you will derive out of each and every dish. And considering that wine is an indelible part of the Georgian lifestyle literally for thousands of years, it is rather logical to assume that Georgian wines should work perfectly with Georgian dishes.
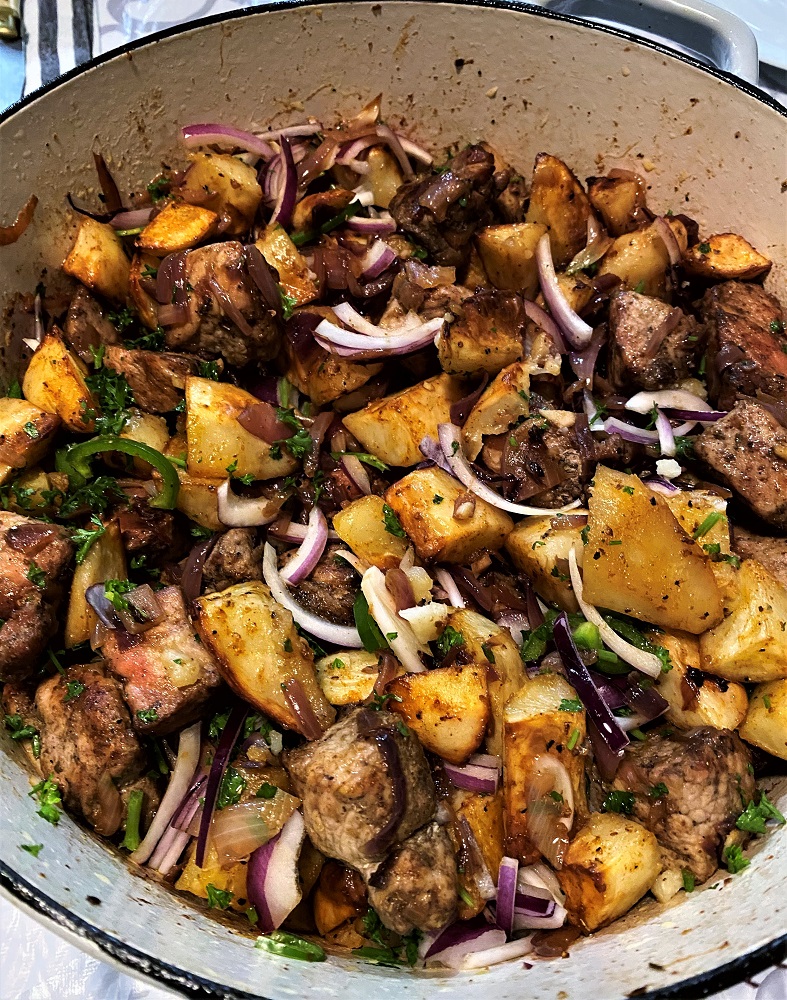
While I love Georgian cuisine, this is not the food I would generally try to make on my own, I prefer to defer the cooking to a few of the Georgian restaurants which we have in reasonable proximity, even though the experience is typically a mix of hit and miss. However, when my sister in law sent me the video with the recipe of the Georgian dish called Odjakhuri, the video looked so good that I decided that I must make the dish as soon as possible, considering that the main ingredients are near and dear to me from the childhood – meat and potatoes.
Back in 2015, we visited a winery in Pennsylvania called Fero Vineyards. In addition to all of the traditional east coast wines, the winery also was making the wine out of my beloved Georgian grape, Saperavi. I tried the wine during our visit, liked it very much (Fero Saperavi made it to the 2015 edition of my annual Top Dozen wines of the year list as #12), and brought home a bottle. After I decided that I will make an Odjakhuri for the Friday night dinner, I realized that I have no Georgian wines on hand – but then I remembered that I had a bottle of Fero Saperavi which I had been looking for a good reason to open for quite some time – and what can I be a better reason than trying it at a family dinner with Georgian dish?
To tell you the truth, I had no idea how it is going to work. First, the bottle I had was the 2013 Fero Saperavi. Who knows if the wine from Pennsylvania can age for 8 years? The wine might be gone already, way gone. But even if the wine is not gone, would Saperavi from Pennsylvania work with the flavors of the dish? Local wines work with local dishes because they went through a slow process of alignment over hundreds of years – well, maybe that is one of the reasons. And here we have a dish with the supposedly proper flavor profile, and proper grape from totally different terroir – everything is possible…
When I was opening the bottle of Fero, I had no expectations. Let me take that back. When I was opening the bottle of Fero, I was expecting that the wine will be past prime. And even if it will be still drinkable, that it will not work with the dish, not for a second. And I’m glad I didn’t make any bets with anyone because I lost on both counts.
The wine was perfectly fresh. It had a ruby color, not hinting at any age. On the nose, there were cherries and herbs, nicely restrained. On the palate, the wine showed a hint of cherries, sage, gamey undertones, tobacco. Perfectly live, perfectly fresh, excellent acidity, medium-plus finish.
The wine also perfectly complemented the dish, enhancing and elevating the flavors and creating a better experience.
Was this pure luck on both counts? The wine was perfectly drinkable and it complimented the dish very well? I don’t have an answer, I’m just reporting on the experience, and raising the question – where are the wine and food pairings created?
This pretty much ends my story about expecting the unexpected, but before we part, I want to leave you with the recipe for this simple and delicious dish.
Disclaimer: Odjakhuri in translation from Georgian means “family”. So as a family meal, I’m sure there are tons of “correct” recipes for this dish. The recipe which I’m sharing is exactly the one we made, thus this is the one I recommend.
Apology: I would love to share a video with you, but an actual video that I have is in the Russian language. Still, I believe it will be useful even without understanding the language, so here it is:
Odjakhuri – Georgian meat and potatoes family dish
Ingredients:
- Meat (pork, beef, chicken) – 2 lb
- Potatoes (Russet would work the best) – 4 lb
- Red onion, medium size, sliced – 4
- Garlic, chopped – 4 cloves
- Cilantro (can be replaced with parsley), chopped – 2 tbsp
- Hot pepper, sliced – 1
- Coriander, ground – 1 tsp
- Sweet paprika – 1 tsp
- Cayenne pepper – 1/2 tsp
- Dill (dried) – 1/2 tsp, optional
- Black pepper, ground – 1/2 tsp
- Salt, by taste
- Olive oil
Steps:
- Potatoes: Preheat oven to 375F. Peel potatoes and slice them into the pieces about 1 inch in size. Put into a large bowl. Add olive oil (you can use any oil you like for roasting), coriander, black pepper, cayenne, paprika, dill (if using), and 2 tbsp of salt (I prefer kosher salt). Mix everything together. Line roasting pan with parchment paper and arrange potatoes preferably in a single layer. Roast for 45-50 minutes – check readiness, potatoes should be crispy but shouldn’t be overlooked. Once ready, get it out of the oven and put it aside.
- Meat. Meat should be prepared as it would be for a kebab. Ideally, it should be sliced into 1-inch cubes and marinated overnight. You can, of course, just roast the meat without marinating it, but marination will add to the flavor of the dish. In our dish, we used bone-in pork loin, I just cut the meat off the bone. If you will be using pork, look for darker meat, it is less prone to drying up while frying.
- Once you put potatoes in the oven, you can start on the meat. Heat a small amount of oil on medium-high heat in the cast iron dutch oven, and fry the meat until ready. If meat is not marinated, use salt, pepper, and any other spices you would like. When ready, get the meat out of the pan. make an effort not to overcook the meat.
- Reduce heat to medium-low, add 3 sliced onions and sauté them slowly, pay attention not to burn them. When almost ready, in about 12 minutes, add garlic and let it cook for another 3 minutes. Now it is time to assemble the dish.
- Reduce heat to low. Return meat to the dutch oven, add roasted potatoes. Add fresh cilantro (or parsley), sliced hot pepper, and last sliced onion, mix everything lightly (try not to crush the potatoes). Let the dish heat up, uncovered, for about 10 minutes, to let the flavors meld. In 10 minutes, turn off the heat, serve and enjoy!
There you have it, my friends. If you don’t have Saperavi on hand, try it with any wine you’d like, and expect the unexpected. Cheers!
Simple Recipes: Roasted Garlic Hummus
Do you like hummus? Well, I can tell you about myself – yes and no.
No questions that everyone’s palate is different, so I can only speak for my perception. I absolutely LOVE well-made hummus – I can eat it by the bowlful. The problem is that it is almost impossible to find well-made hummus here in the US (if you are in Israel, it is an entirely different story). You can occasionally find something decent at an appropriate restaurant (typically Mediterranean or Middle Eastern), but it is practically impossible to find anything decent in the store – I encountered some exceptions, but they are really, really rare (for about 3 months, Costco was offering a hummus brand called Shamir – it was delicious. Then it disappeared, and I simply stopped buying any hummus from Costco).
It is hard to describe “well-made” hummus – it is a combination of taste and texture, and it shouldn’t have the annoying flattening acidity which makes everything taste so dull. So if you like hummus as much as I do, I have a recipe for you which I’m happy to share.

All you need to make a tasty hummus
Making a great hummus is simple – basically, you only need three ingredients to start – chickpeas, also known as garbanzo beans, salt, and olive oil. I’m sure you can make a nice hummus with only these three ingredients, but I like a bit more flavor in mine, so I add another 3 ingredients – garlic, tahini, and lemon. Here is the full list:
Ingredients:
- Dry chickpeas – 1 lb
- Olive oil – 2.5 cups (approx)
- Kosher salt – 2 tablespoons
- Tahini – 1 cup
- Garlic – 1 head plus 3-4 cloves
- Lemon – 1 large or 2 small
There are a few steps involved here. First, you will need roasted garlic-infused olive oil – you can prepare that in advance at any time (store it in a tight container and enjoy for weeks with a slice of bread or use in any cooking which might benefit from the garlic flavor). Roasted garlic-infused oil is very easy to make. Peel and clean a whole head of garlic, then mince it all finely (don’t use a garlic press, I don’t believe it will work well). Pour two cups of the olive oil in a large skillet, and put it on the lowest heat possible. Add minced garlic and let it slowly simmer until garlic will become lightly golden. It is important that you will use the lowest heat setting – even on the medium heat, minced garlic will roast in no time, and oil will not absorb the delicious sweet flavor of roasted garlic. Ideally, it will take you about 15 minutes to get to the lightly golden roasted garlic (don’t let it become dark/brown – at this point, it might become bitter) – you need to lightly stir it occasionally. Once you are done, remove from heat and let it cool off before pouring it off to a container with a tight lid (I use a large glass jar for this purpose).

Minced garlic

Roasted garlic in progress


Now, let’s start with chickpeas. We are using dry chickpeas here. Yes, you can use the chickpeas from the can, but I don’t believe you will end up with the quality hummus, so it is up to you if you want to cut the corners here. When using dry chickpeas, first you need to soak them. Take large (8 qt) pot, put in dry chickpeas, add about 6 qt of cold (!) water, cover, and let stand overnight. Try not to exceed 12 hours of soaking time – I happened to do so once, and when I opened the pot I found that the water was not clear with some foam on top as some process started with chickpeas – had to throw out the whole batch as I was afraid to cook with them. In the morning, put the pot on the high heat, wait until the water will start boiling. While the pot is starting to boil, you will see foam forming, same as with any broth – I prefer to remove that foam – it might boil over it, true – but again, I prefer to remove it. Once the water is boiling, add 2 tablespoons of the kosher salt, reduce heat and let it simmer until chickpeas are cooked through – will take you about two hours. Once chickpeas are ready, just remove the pot from the hit and put aside – don’t discard water as you will need it later.

Chickpeas before soaking

Chickpeas after soaking
Now, for a difficult part. To make hummus smooth and creamy, you need to remove the outer shell from the chickpeas, usually called the skin. This is not a simple task, as you mainly have to do it by hand, once chickpeas are cooked through and cooled off enough that you can handle them. What I’m trying to do it to remove the skins which will float in the pot while chickpeas are cooking, and then I work them one by one for as long as I have enough patience. I read about different methods such as using baking soda to help with the removal of the skin but it doesn’t sound appealing to me, so I never tried that. At the end of the day, if you will not remove all the skins, you will end up with a bit grainier hummus than you might want it to be, but it will be unquestionably tasty.

Chickpeas cooking is done


Now, your prep is done, and it is the time to make hummus. You will need a blender at this step. I’m sure you can use an immersion blender, but I’m using the standalone pitcher canister, so all the instructions and illustrations are for this method.
One quick word on tahini before we continue. Tahini is a sesame seed paste, which was always used in Mediterranean/Middle East cooking, and now it became popular in the USA. You can get it online, at many higher-end supermarkets (Whole Foods, Fairway) and even at Trader Joe’s. Once you open a jar, make sure to spend a few minutes to mix it well, as it usually clumps together – use the spoon or a fork to make sure the content of the jar is smooth and well mixed from the bottom to the top.
I prefer to process the chickpeas in two batches. For each batch, I do the following. First, peel 1-2 cloves of garlic and put it in the blender. Add 3-4 of tablespoons of water from the chickpeas pot with some occasional chickpeas. Squeeze juice of 1 lemon (or half of large one). Add two tablespoons of olive oil (garlic-infused or not, makes no difference at this point). Cover and blend until smooth -this will be our base to proceed with the chickpeas. Next, use a colander spoon to add half of the cooked chickpeas into the blender. Add half a cup of tahini and a cup of roasted garlic oil with garlic pieces. Cover and blend until smooth. Once done, move it from the blender to the container. I suggest you will taste it at this point for all the components – do you like what you taste? Need more lemon? Need more salt? Need more tahini? Is that smooth and creamy enough or is it a little tight? The reason you need to do it now because you can fix all the shortcomings with the second batch. Not enough lemon? Add extra. Not enough tahini? Add extra. Too dense? Add more chickpeas liquid or oil. With all the corrections in mind, make the second batch, then combine the two and mix them together. Voilà – your hummus is ready to be enjoyed. Well, make sure it is well chilled, and enjoy. When serving, you can smooth it out and put a drizzle of olive oil on top.


This recipe should give you a basic idea – from here on, you can make it yours by adding and removing any elements. But I would still suggest trying this recipe first and see how you want to change it. Also, keep in mind that the ingredients matter. At this point, I used chickpeas from three different sources – Goya (prepackaged), Fairway organic, and prepackaged ones from Lior (used it for the first time), and all three yielded different results. Fairway organic is my favorite. I’m okay with Goya, and I’m not buying Lior again (not very happy with the result). If you plan on making your own hummus all the time, find what works for you.

Hummus is served
That’s all I have for you, my friends. Not a word about wine in this post – but I promise to rectify it next time. Cheers!
Perfection, or When Everything Works Together…
 If you are into wine and food (or food and wine, whatever your preferences are), I can safely bet you were looking for that climactic moment of combining the food and wine to reach a new, higher level of pleasure. Yes, I’m talking about that “oh my God” moment when your taste buds experienced that already exceptional bite of food becoming something beyond exceptional in combination with the sip of the wine. By the same token, if you were looking for that moment, I’m sure that more often than not (actually, a lot more often than not) you couldn’t find it – those beautiful pairings are often equally evasive.
Here I want to share with you my account of my recent encounter with perfection, that climatic experience if you will.
A few months ago I got a box in the mail (one of the little perks of the wine blogger). Inside, there was a bottle of wine, a bottle of olive oil, a jar of sea salt and a recipe – for Bistecca alla Fiorentina.
Bistecca alla Fiorentina is a dish coming from Tuscany (Florence) and depending on the historical account, it traces its origins either to the 16th or the 19th century – well, the history of Bistecca all Fiorentina is definitely not something we will be talking about here, so let’s move on. I’m sure you understand that “Bistecca” simply stands for “beef steak”. However, the recipe calls not for any steak, but specifically for the porterhouse or T-bone steak, which should be simply prepared rare or medium-rare over the charcoal. As the recipe is very simple, here it is in its entirety:
Ingredients (serves 4):
2 (1.5″ thick) bone-in porterhouse steaks (3.5 lb)
1/4 cup Il Poggione EVOO
Tuscan sea salt and freshly ground black pepper, to taste
2 sprigs rosemary


Get the charcoal ready. The distance between the hot charcoal and the steak should be about 4 inches (10 cm). The steak should be at room temperature before you start grilling (it should be out of the fridge for about 10 hours to get to room temperature). Grill steak on one side for 5-8 minutes, flip it with tongs (no forks of any kind!), salt the top surface with Tuscan sea salt and pour some olive oil. Cook for another 5-8 minutes, then stand the steaks on the bone and cook for another 5 minutes. Take it off the heat, put it down to rest, salt the other side and put some olive oil on it. After 5 minutes of rest, you can slice and serve your steak. See, can it get any simpler?


")
Now, it is time to talk about perfection.
First, the perfection started with the exceptional meat. In addition to what I already described, the box contained a gift card for Pat LaFrieda. The story of Pat LaFrieda Meat Purveyors started at the beginning of the 20th century when Anthony LaFrieda arrived in the USA and opened his first butchery – you can read the rest of the story on Pat LaFrieda website. Whatever the story is, the proof is always in the pudding – or on the fork in this case. I have to honestly tell you that I never had a better steak than this – the meat was sublime and was simply melting in the mouth – a good start for the perfect experience.


The second element of the perfection was, of course, the wine – 2016 Il Poggione Rosso di Montalcino (14% ABV, $27, 12 months in large oak barrels). Tenuta Il Poggione is one of the oldest producers in the Montalcino area, started to make Sangiovese wines – now known as Brunello – at the beginning of the 1900s. Today, it is one of the largest wineries in Montalcino, with 1500 acres, out of which more than 300 acres are under vines and 170 acres planted with olive trees (that Il Poggione EVOO in the package was superb).
The wine actually happened to be one of the best Rosso di Montalcino wines I tasted in a long time. The key word to describe this wine is finesse – it had a welcoming nose of tart cherries, medium intensity, and a hint of herbs. That profile perfectly continued on the palate, where delicate fresh cherries were joined by sage and rosemary, with clean acidity and excellent balance. Definitely one lip-smacking, delicious wine (8+).


Let’s not miss any details – we are talking about the perfect pairing here. As the devil is in the detail, there was one more element – little, but essential – to this amazing pairing, besides superb meat and outstanding wine. The last element? Tuscan sea salt. This was not some random sea salt – this one was Tuscan Sea Salt from AG Ferrari, listing the following ingredients: “Italian sea salt, fresh rosemary, fresh garlic, sugar, fresh sage, ground black pepper” – this Tuscan Sea Salt became the bridge which connected the flavor of the seasoned meat with the perfectly aligned flavor profile of the Il Poggione Rosso di Montalcino, delivering the genius pairing and an amazing experience.
I have to honestly tell you – I tried to replicate this experience two days ago – and failed. I used the same Tuscan Sea Salt, but I had a steak from the local supermarket butcher shop (1/3 of the price compared to Pat LaFrieda), and the wine was 2015 Collosorbo Rosso di Montalcino. The steak was simply not good (happy to be blamed for it as a cook – but I cooked the one from Pat LaFrieda too). The wine was okay, but a lot fruitier than Il Poggione, thus the pairing simply didn’t work. This once again proves my point about the evasive nature of a great wine pairing.
Did you have any climactic food and wine pairing experiences you care to share with the world? Or maybe you want to recount the worst moments? Will be happy to hear about it either way. Cheers!
Flavor, Next Level – Beyond Salt And Pepper
 I love cooking. Cooking allows you to be creative, and you are only limited by your own imagination in what will show up on the table in the end. That and maybe some skill – but skill, of course, can be learned and mastered.
While creativity, imagination, and skill are important, one quality will separate success and failure in the final dish – flavor. Of course, the situation is not that dramatic in real life – this is what “not too bad” and “interesting” descriptors are for, but the flavor rules. This for sure is true in the home cooking. If dish on the table looks great – excellent, definitely a bonus. The texture typically is important too – if the rice more resembles mashed potatoes, that is not really cool. But flavor rules – once we take the first bite, the presentation becomes secondary and the flavor is what we are looking for to either jump of joy and pleasure or make face and say “ouch” (don’t strangle that inner kid in you, let the reaction come out).
One of my favorite shows on the TV is “Beat Bobby Flay” on the Food Network. Bobby Flay, who is an Iron Chef and a well-known restaurateur, is challenged by some other, also well established and well-regarded chefs, to cook the dish of their choice, their own “signature dish”. The panel of three judges decides on who made a better dish in a blind taste test. Quite often, Bobby Flay wins even when he has to cook the dish he only tried once in his life and never cooked before – and sometimes even those which he never tried. What makes him the winner? When you listen to the judges explaining their decision, there is one most important word which you hear over and over again – flavor. The dish might not look anything like the classic version, and sometimes even not taste anything like the classic version, and nevertheless, the Flavor is the word you hear the most often, explaining the vote of A versus B.
If you see home cooking as a chore, this is probably not the post you want to continue reading. If, however, you are after the pleasure of both cooking and then eating the tasty food, let’s talk more about flavor. As a home cook, you have an arsenal of tools available to you to achieve the flavor – you start simply with herbs and spices, and then enlist the help of various techniques and methods – marinating, basting, slow cooking, pressure cooking and on, and on, and on. I personally like cooking with open fire, and thus grilling is definitely one of my preferred methods, especially when the weather is cooperating.
One of the things I like using to enhance the flavor of the food on the grill is a cedar plank. I would typically make salmon on the cedar plank so the salmon would have that delicious sweet smokey flavor. There is only one problem with this – I typically forget to pre-soak the plank at least for an hour – and unless the wood is soaked, it will burn in no time on its encounter with open flames.
It appears, that my problem (don’t tell me it is only my problem, and looking on a gorgeous piece of salmon you never had to hit yourself on a forehead saying “why I didn’t prepare the plank before”) had been solved! Here comes Beyond Salt and Pepper – a company which was founded (I’m very happy to give you full disclosure here) by my close friend Henry. We always shared our love for cooking with Henry, but Beyond Salt and Pepper takes that passion to the next level.
Pre-soaking of the plank is required before using it for cooking. I’m sure that when you think about soaking of the wood, you think water. But why only water? Wine is a liquid too, and wine is used in cooking, so maybe…? That’s right – we can use the wine, but not only the wine, also beer, rum, bourbon and any other type of alcohol – each one bringing its own unique flavor profile to the table – your table.
I visited my friend – and essentially, the headquarters of Beyond Salt and Pepper, located in the garage, as any self-respecting startup should – and we had a blast (a feast would be a better word).
")
")
")
")
First, I saw the process – the pre-cut planks of cedar – but not only cedar, Henry uses white oak too and says that imparts particularly nice flavor on the steaks – are soaked in the liquid of choice for days. Then the planks are getting into the machine where they are vacuum-sealed. Put on the label, pack, and voilà, ready for shipping.
And then there was cooking, lots of cooking. If you are still thinking planks are only for salmon, forget this notion as soon as possible. Unleash your imagination – you can make anything you want on the planks – and you can see the proof here in the pictures.
")
")
")
")
")
")
When cooking with the planks, there is a bit of technique which goes into the process – all explained in the recipes available on the Beyond Salt and Pepper web site. In most of the cases, you need to pre-heat the plank by putting in on a hot grill for 1 – 2 minutes on each side. And then you slightly pre-cook the food – for instance, sear steak on one side, and then flip it over on the plank and let it continue cooking as usual – that’s about all the special technique you need.
")
")
")
")
")
")
")
")
")
")
")
")
We had asparagus, artichokes and snap peas cooked on the Chardonnay-soaked planks – we couldn’t keep the snap peas on the table, everyone loved them. How about some little red wine infused smoke on the mushrooms and potatoes? Salmon and tiger shrimp on the Bourbon soaked planks? Yes, please! Chicken with some Merlot smoke on it – yum! Then the steak on the white oak and rum planks – superb. And then some cheese for dessert – but of course, made on the Chardonnay infused plank. Flavor, flavor, flavor – there are no limits to one’s creativity.

Here you are, my friends – a simple tool to add to your cooking tools arsenal, to get the flavor to the next level. If you are interested in trying these planks for yourself (and you should, seriously), you can get them directly from the website, or on Amazon (the website offers a bit wider selection). If you need some inspiration and cooking ideas, follow Beyond Salt and Pepper on Instagram. And by the way, while on the website, look for their selection of gourmet peanut butter… Mmmmm… Happy cooking!
Thanksgiving Day Experiences
Thanksgiving is one of my most favorite holidays. It revolves around food. Before you beat me up, of course, it is about family, friends and lots and lots of good reason to be thankful – but still, the food is at the core of this family gathering. This makes me double-happy – I get to spend time with the family and cook my heart out – and let’s not forget the extra bonus – I have a reason to chose special wines.
Since this blog started, there was only one year when I didn’t post about Thanksgiving. Otherwise, I did my best to talk about food and wine experience of this special day, sometimes even with few posts on the subject (you can find those posts here). This year, I had two resolutions for my Thanksgiving dinner. First, it will be simple – which means no Turducken, for instance. Second, I will serve only an American wines – to be more precise, only the wines from California. As Napa and Sonoma greatly suffered from the recent fires, this was only logical to embrace Californian wines to support the people there.

First, let me say a few words about the food. Turkey is a cornerstone of Thanksgiving – at the same time, it is hard to cook a whole turkey in really an exciting way. Over the years, we tried lots and lots of different recipes – with stuffing and without, turducken, smoked, deep fried, deboned… Some were definitely better than the others (turducken is typically a standout), and some of those preparations can be very laborious. Thus this year, I decided the smoked turkey is the way to go.
This was not a random decision – earlier this year I discovered so-called PBC (Pit Barrel Cooker), which I absolutely fell in love with. In the past, I had to spend literally a whole day, dancing around my simple smoker, trying to maintain the temperature and still ending up cooking all the food in the oven. PBC changed that dramatically – no need to precook ribs anymore, just start the fire, hang your piece of meat and come back in a few hours to enjoy. Based on all the prior success, smoking the turkey was simply a done deal.
This might be the simplest turkey I ever have done. Buy already brined turkey (many stores sell pre-brined turkey, which greatly simplifies your life), rub it generously with PBC All-purpose rub, start the fire and just hang it inside the PBC – you can estimate the cooking time based on the size, and of course, use the meat thermometer to make sure the turkey is cooked through.


Another dish I want to mention is the dessert. I got a recipe from a friend, many years ago – however, it was also a while since I made this dessert. I wanted to find a similar recipe online, just to use it as a reference – but failed. So here is the recipe without the usual ingredients and measurements, as here you can make everything approximately. Let’s call this dessert
Crepes Napoleon with Wine-poached Pears and Cranberry sauce
You will need the following:
- 4 firm pears, I recommend Anjou, carefully peeled, halved and cored
- 10-12 crepes (can be more, can be less, depending on how many layers do you want)
- 1 lb cranberry sauce (canned is fine, fresh is better)
- 1 bottle of port – you can use red wine too, but then you would need to add sugar.
- 1 cinnamon stick
- 1/4 teaspoon nutmeg
Put peeled, halved and cored pears into the large pot, cover it with wine, add cinnamon stick and nutmeg, and put it on the stove. Once liquid started boiling, reduce heat and let it simmer for about 30 minutes. Remove from heat, cover and let peras to cool off completely in the wine, preferably overnight (when cool enough, put the whole pot into the refrigerator). Next day, thinly slice pears and put aside. You can also reduce the wine for a later use – it is quite delicious.
You can buy crepes or you can make crepes. If you will decide to make them, Alton Brown has an excellent recipe – this is what I used.


Once crepes are made and cooled off, you are ready to start making the Napoleon! Take a plate you will serve the dessert on. Put the first crepe on the bottom. Thinly spread cranberry sauce. Cover with another crepe. Now take slices of pear and put them around the crepe in a single layer. Cover with another crepe, spread cranberry sauce, cover, put pears and continue the process until you will be satisfied with the overall height of the Napoleon. I recommend a round of pear slices on top with cranberry sauce in the center, but of course, you can make your own decoration. Cover (plastic wrap will do) and put it in the cool place for the flavors to be absorbed into the crepes. Later on, slice and enjoy!
Time to talk wines!


Holiday celebration should start with the sparkling, isn’t it? Finding tasty California sparkling wine is really not a problem. One of my favorite California producers, Field Recordings, offers an interesting selection of the sparkling wines, with most of them packaged in the cans (yes, cans). I had a can of NV Field Recordings Methodé Aluminum Edna Valley (11.9% ABV, 100% Pinot Noir), and it provided a perfect start for the evening – fresh, supple, with good body weight and a nice touch of a fresh bread – definitely was a crowd pleaser.
I wanted to have a full California wine experience, so next, we moved on to Rosé – 2016 Conundrum Rosé California (13.1% ABV). Truth be told, I’m not a fun of Wagner family wines – Conundrum, Meiomi, Caymus – doesn’t matter, they generally don’t work for my palate. So I threw in the bottle of this Conundrum Rosé simply because it was available – I thought we will open it, taste it and move on. Boy, was I wrong. This wine had beautiful strawberries all the way on the nose and the palate, supported by tons of herbs – lavender, mint, basil. Perfect mouthfeel with very good presence, but not overwhelming and with good acidity – this wine was enjoyed to the fullest.
We drink with our eyes first – thus the label on the 2014 Durant and Booth Blanc California (14.6% ABV, $36, blend of Chardonnay, Grenache Blanc, Ribolla Gialla, Roussanne, Greco di Tufo) was extremely drinkable and very promising (the label represents the art technique called water marbling – you can read more here if you are as intrigued as I was). I brought this wine from California after attending Wine Bloggers Conference 2017, where this wine was presented to us at the Napa Valley Vintners lunch – I plan to write a separate post about this event).
As you can tell, this wine is made from quite a few grapes, and I’m typically a bit concerned if the chorus will sing harmoniously. Oh yes, it was – starting from the beautiful touch of butter and vanilla on the nose and the palate, then immediately offering silky plumpness of Roussanne with a gentle touch of butter and tropical fruit on the palate – this delicious wine was gone in no time.


Next, it was the time to move on to the red wines. We started with 2014 Acorn Alegria Vineyards Cabernet Franc Russian River Valley (12.5% ABV, $38, 93% Cabernet Franc, 2% Malbec, 2% Merlot, 2% Petite Verdot, 1% Cabernet Sauvignon and Tannat). All Acorn wines are made from a co-fermented blend of grape varieties which are growing at Acorn’s Alegria Vineyard. This Cabernet Franc had a beautiful open nose with a touch of mint and cassis – the same continued on the palate with more cassis in a smooth, round package, supported by some herbal notes and perfect acidity. It was unmistakably Cabernet Franc, but also unmistakably California Cab Franc, without much of the green bell pepper presence and fruit dominant, but perfectly balanced.
Our last red was coming from the California region I was not really familiar with until now – El Dorado County (it is not only gold you find there, yep). 2015 Boeger Barbera El Dorado (15% ABV) was another wine I brought back from California after the same wine bloggers conference. I tried few of the El Dorado wines at the conference and was not very impressed, so I looked at it as an interesting experiment. Another score! This wine was dense and brooding, with tar and tobacco on the nose, and surprisingly polished dark fruit on the palate with sweet tobacco undertones. To make things even more interesting, I can tell you that we didn’t finish the wine during dinner, so I pumped the air out using the usual Vacuvin, and put the bottle aside almost for 10 days. After 10 days, the wine was still perfectly fresh and enjoyable, which makes me wonder how long this wine can actually age.
Time to finish our Thanksgiving dinner with the dessert. As our planned dessert had cranberry sauce in it, I decided to go with Cranberry wine for dessert. Tomasello Cranberry Wine New Jersey (9% ABV) was a perfect pick for it – good acidity, tart cranberry profile, it played perfectly with our dessert – while the wine was not from California, it still provided a perfect finish for our celebration.
Here we are, my friends. How was your Thanksgiving? Did you enjoy more the turkey, the wines or the company? Cheers!
The Dinner Party Collective – Full Spring Menu and Smoked Salmon Recipe
 As Fall settling in the most of the Northern Hemisphere (slowly, I have to admit – it is still very warm and green here in Connecticut), the Spring is coming to the people of Southern Hemisphere, who are I’m sure very happy to forget the cold and embrace the sun. With Spring comes The Dinner Party Collective Spring Menu (if you need more information about The Dinner Party Collective, please see one of my previous posts about TDPC, as we call it for short).
Our Spring Menu had been fully published, and I was very happy to pair all the delicious dishes the wines, as you will see below in the wine pairing suggestions post:
Appetizer – Smoked Salmon Salad
Main course – Lemon Thyme Lamb Racks with Goat Cheese Aioli
Dessert – Lemon & Coconut Cheesecake with Strawberry Purée
I think all the dishes are absolutely spectacular, and I hope you are all already inviting your friends over for a delicious dinner (and let me know how the wine pairings would work).
This time around, I want to take a liberty to add a little trick, if you will, to one of the dishes on this menu – a Smoked Salmon Salad created by Margot from Gather and Graze. You see, my family loves smoked salmon in any shape and form – on the bagel, in the salad, in the appetizer, anywhere. When you buy smoked salmon from the store, there are couple of issues. First one is the taste and overall quality – sometimes it can be oversalted, dry or even rubbery. Second, the better quality smoked salmon is often quite expensive – Fairway store in Stamford charges $24 – $30 per pound of that smoked salmon. So instead of dealing with uncertain quality and high prices, you can make smoked salmon on your own – it is very easy – and you fully control the flavor profile. That’s right – when making smoked salmon on your own ( and you don’t have to make it taste “smoked” if you don’t like it), you can add any spices – dill, pepper, herbs – anything – and it is really easy to make.
Here is what you will need:
- 3 lb fresh salmon fillet, preferably with the skin (make sure all the pin bones are removed)
- 1 cup kosher salt (Kosher salt without iodine is a must for curing and brining)
- 1/2 cup brown sugar (I use “sugar in the raw”)
- pepper – by your taste
- liquid smoke (if you want to make “smoked salmon”)
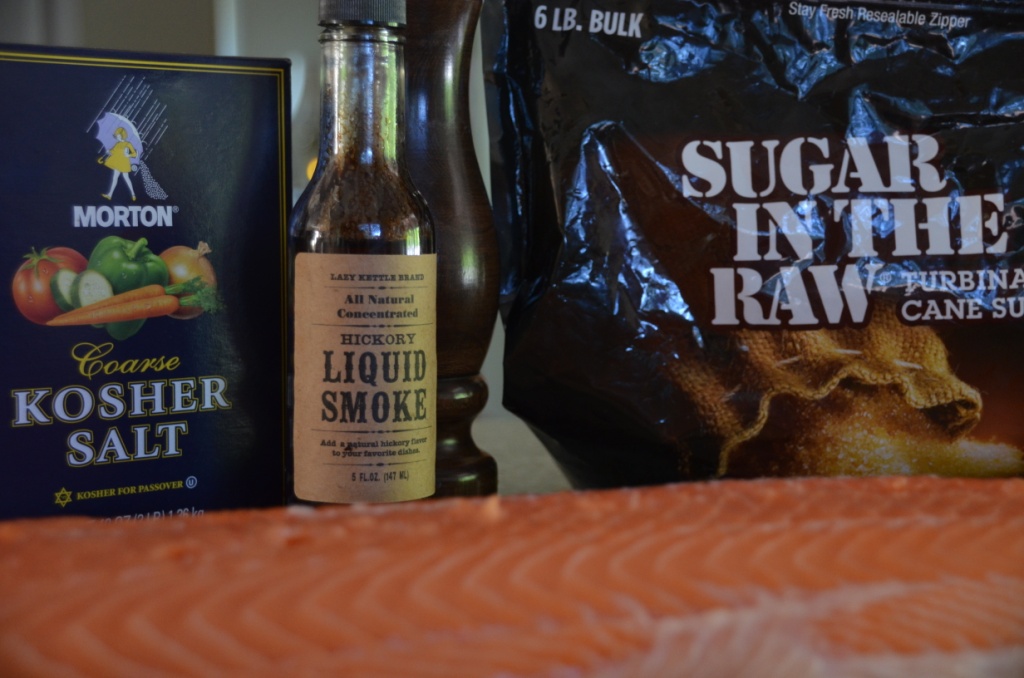 Above you see everything you need – please note the bottle of Liquid Smoke there – available at most of the supermarkets or you can order it online. Few drops will impart smoke flavor on any dish you are making.
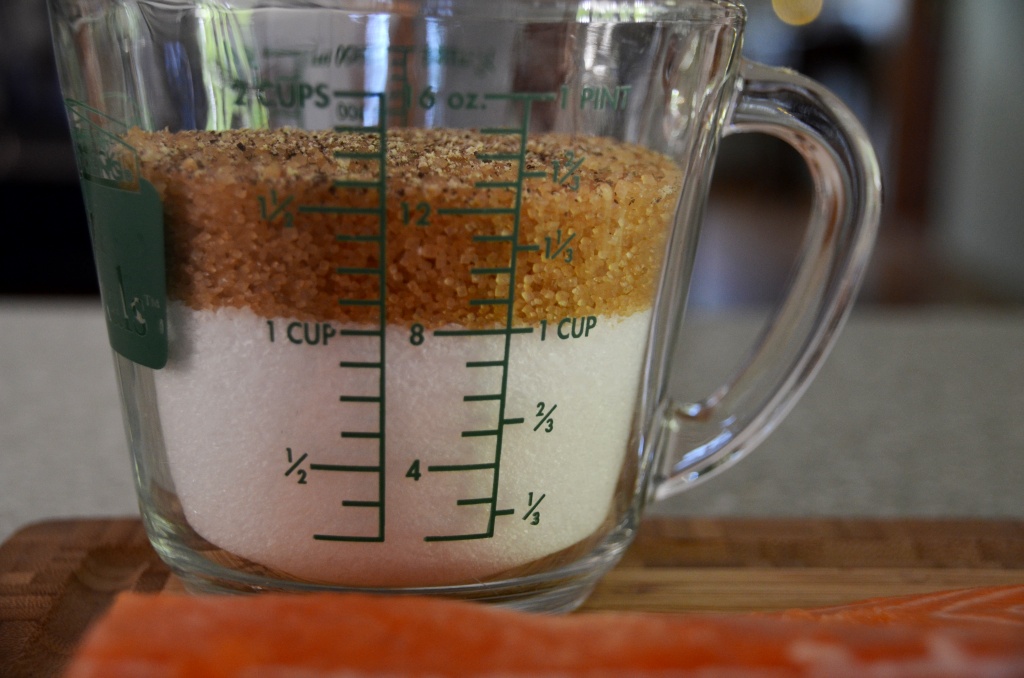
Prepare the mix of kosher salt, brown sugar and pepper – feel free to add any other spices here you would want to use, and mix it all up – I do it right in the measuring glass:
 Put a very thin layer of the mix at the bottom of the large glass cooking dish (I’m sure you can use the foil tray as well, but I prefer using the glass tray), and put salmon filet on top:
 Now, completely cover the salmon with the mix, top and sides:
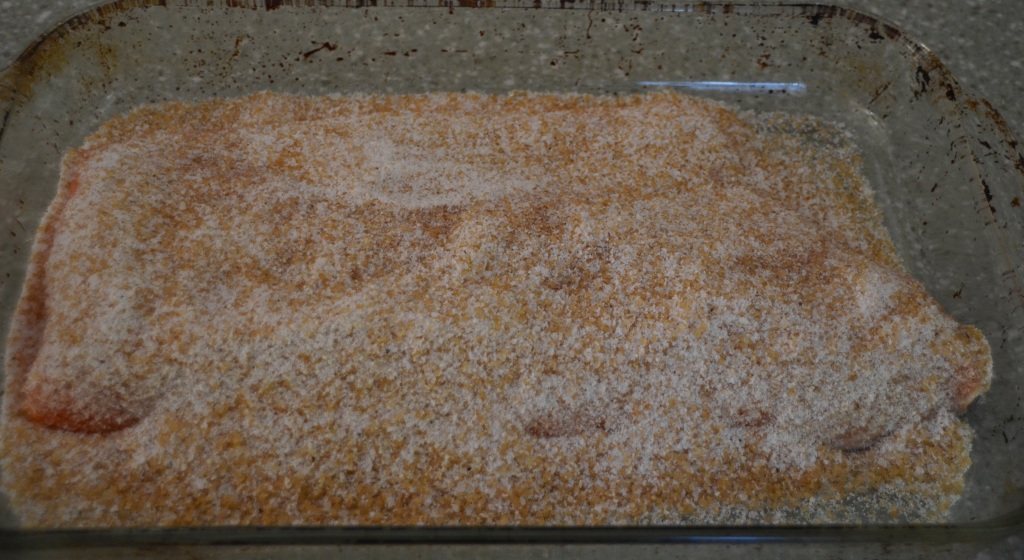 Cover with the plastic wrap and put it in the fridge for 24 hours. The next day, take it out of the fridge, and you will see something like that:
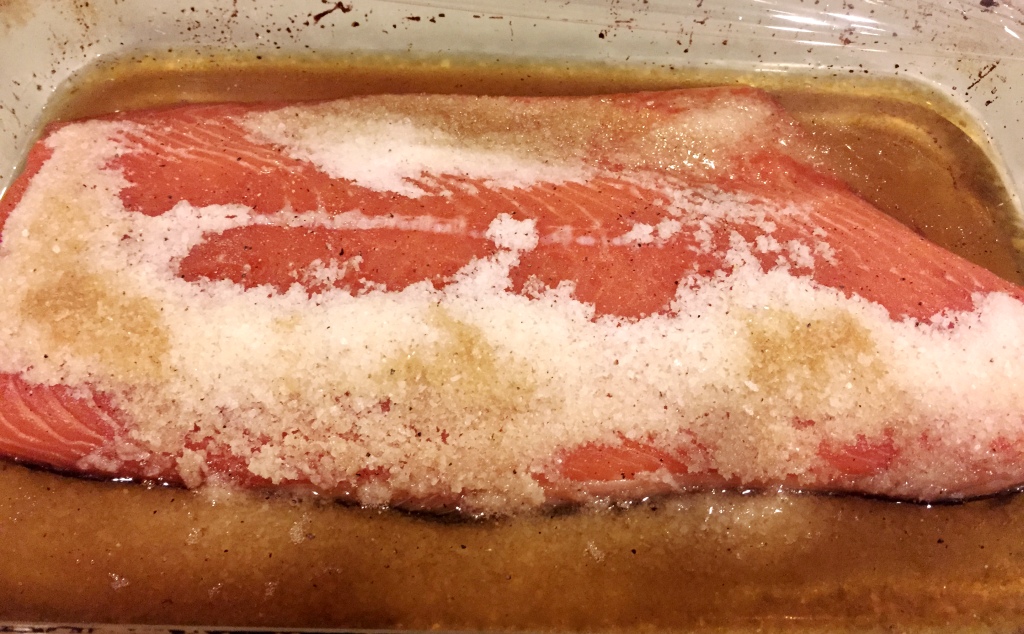 Drain the liquid (as much as you easily can, don’t strain it completely). Technically, salmon is now ready to eat – it is completely cured. From now on, I like to make it “smoked” so I add a few drops of Liquid Smoke all over salmon and around, cover with plastic wrap and put it in the fridge for another 12 hours. Important note – the longer you will keep salmon with the salt, the drier and denser it will become, as it will lose more juice.
After 12 hours, your smoked salmon is fully ready – get it out of the fridge, wash it thoroughly to rid of any salt, and lay it to rest on the board – you can keep it there for an hour or even longer. This is how it will look like:
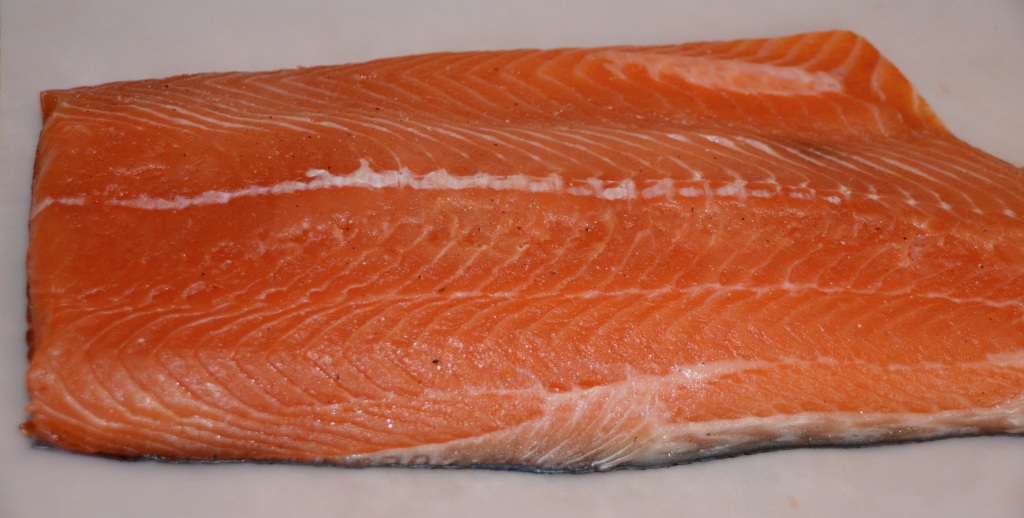 I like to give it even longer rest time if I’m not too hungry, so I would typically wrap it completely into the plastic wrap and put it back in the fridge for a few hours. Salt dries the surface completely, so by letting the salmon rest, it will redistribute the juices so it will become all moist and delicious. Last step – slice and enjoy!
 I would typically slice it off the skin as needed, and keep the rest wrapped in the plastic wrap in the fridge. As it is cured, it will last for a pretty long time – between a week and two for sure. It is also very easy to freeze as it is, right in the plastic wrap – and it can be thawed quickly as needed.
There you have it my friends – a simple smoked salmon recipe. Yes, do that at home!
If you will decide to make it – let me know how it will come out. Cheers!
The Dinner Party Collective – Full Fall/Autumn Menu
A quick update on the fun project I had been involved with – The Dinner Party Collective (TDPC for short). For those of you unfamiliar with TDPC – it is a collaborative project of food and wine bloggers, aimed at creating full dinner menus with focus on seasonal ingredients in both northern and southern hemispheres, and with all the dishes on the menu coming with suggested wine pairings. TDPC is a brain child of Margot from Gather and Graze, which started early in 2015. TDPC was mentioned in the WordPress article in July as one of the 4 food blogs to watch. Earlier in the year, we published a set of Winter and Summer menus.
Now the time has come for the Fall/Autumn and Spring menus. First, the Fall/Autumn menu was fully published, so here are all the links:
Appetizer – Trio of Root Vegetable Dips
Main Course – Beef Bourguignon
All the recipes include wine pairing notes and suggestions from Stefano (Flora’s Table, Clicks & Corks).
Spring menu overview will be coming out tomorrow, with the wine pairings and all the dishes to follow. Happy cooking! Cheers!
Last Bottle Sign Up ($10 credit)


![]()
